
Vitaly
Writing Hebrew letters only seems difficult at first glance. Yes, the right-to-left direction and unusual shapes raise questions — but after a couple of practice sessions, your hand gets used to it, and the letters cease to be intimidating. This article explains how to write each letter correctly, what to pay attention to, how handwriting differs from printing, and how to develop beautiful, legible handwriting.
The ability to write in Hebrew is an important step towards full mastery of the language: it helps you to understand the structure of letters more deeply, commit words to memory and gain confidence. Once you have mastered writing, you will be able to write anything in Hebrew – from your name to your favourite phrase – and easily share it with those around you.
At first glance, Hebrew looks unusual in writing: there are no familiar letters, and the direction of the lines seems to be “backwards”. Beginners often ask how to write in Hebrew, which way to move the pen across the paper. The answer is simple: in Hebrew, text is written from right to left. This tradition dates back to ancient times and has been preserved to this day.


In addition to direction, handwriting differs from printed fonts. Capital (handwritten) Hebrew letters differ significantly in shape from printed ones, but there is no need to be alarmed — there is nothing complicated about learning them. It is best to practise using special writing exercises. Regularly write each letter in a notebook or on the screen, and copy short texts. Gradually, you will get used to it and stop noticing which way Hebrew is written: your hand will start to draw the lines correctly on its own. If you practise writing in Hebrew constantly, your first uncertain scribbles will very soon turn into neat Hebrew handwriting.
Many beginners find writing Hebrew letters difficult, but in practice it is easier to learn than expected. It is important to choose the right learning technique. First, learn the letters gradually, one at a time or in small groups. First, analyse the shape of each letter: compare the printed and written versions, and find the distinctive elements. Second, practise immediately: once you have learned a new letter, take a pen and write it several times. Pay attention to the direction of the strokes: lines are usually drawn from top to bottom and from right to left, in accordance with the general direction of writing.
Here is a brief guide to writing each letter of the Hebrew alphabet. Each Hebrew letter should be written in a specific order of strokes. Let's take a look at all the letters from aleph to tav — how they look in writing and how to form them.
First, draw an arc open to the right: it starts at the top and goes downwards, like a soft Latin “s”. Then, draw a slanted line across it, from top to bottom, which slightly protrudes above the top and reaches the line. These two strokes do not connect — there is a slight space between them.
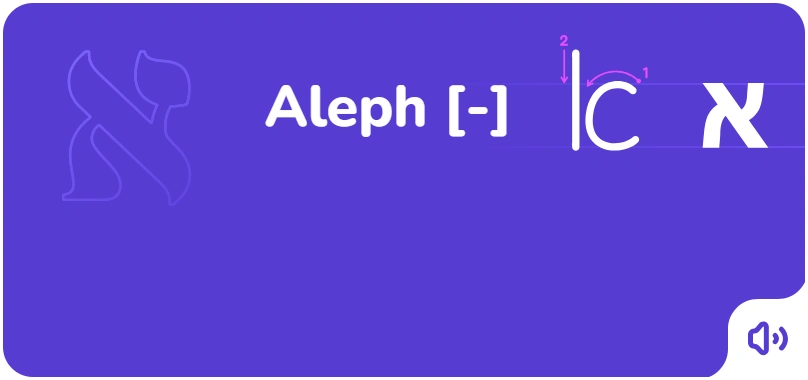
Capital letter Aleph in Hebrew
It is written in one continuous stroke. Start at the top, move to the right, then down, then turn left and up again, without reaching the beginning — this creates a closed loop with a tail. It is important to round the corners — the letter is soft, not broken.
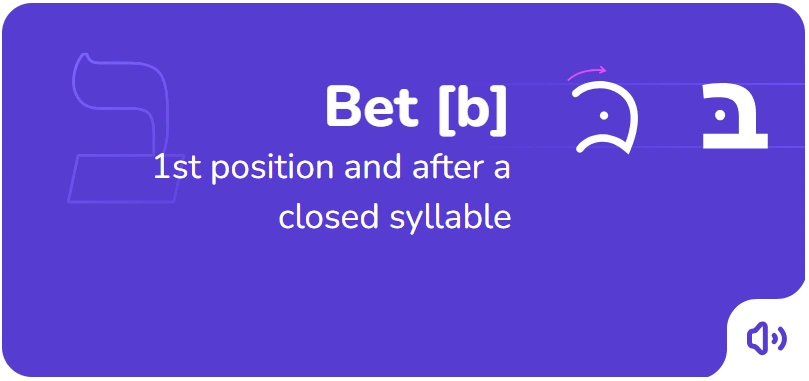
Capital letter Bet in Hebrew
Vet is identical to bet in terms of spelling, only without the internal dot.
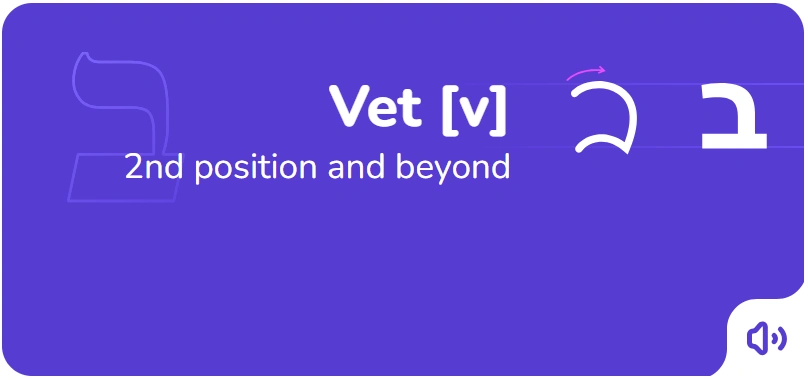
Capital letter Vet in Hebrew
Start with a small horizontal line to the right. Then, from its end, draw a long curved stroke down and to the left, resembling a hook. The lower end may bend slightly upwards, like a tail.
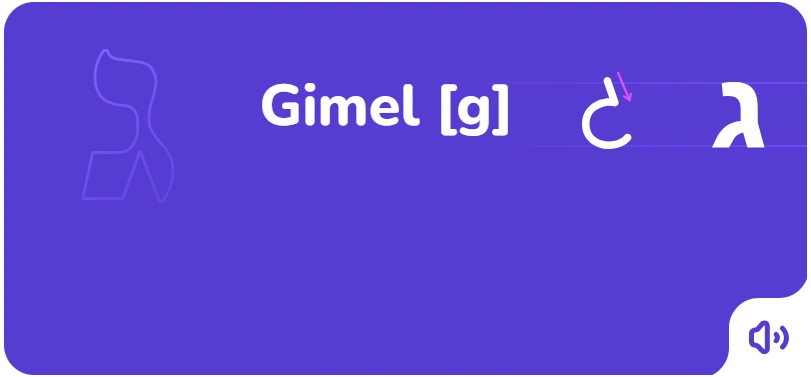
Capital letter Gimel in Hebrew
We begin with a short horizontal line from left to right. From its right edge, a downward curved stroke descends, which follows an arc slightly to the left. This creates an angle, but without any sharp intersections — the shape is smooth.
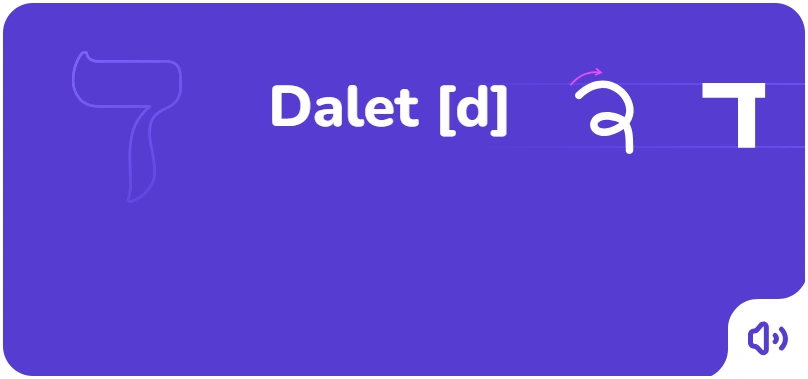
Capital letter Dalet in Hebrew
It consists of two parts. First, draw a loop with an indent on the right: to the right, downwards. Then draw a short vertical line on the left, but not all the way to the end — leaving an open space between the elements.
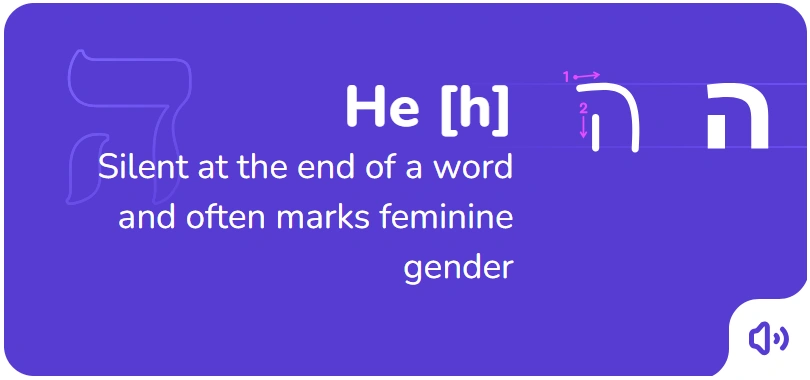
Capital letter He in Hebrew
One short stroke from top to bottom with a slight bend to the left at the bottom edge. Essentially, it is a vertical line with a “soft” end. Simple, but requires accuracy in proportions.
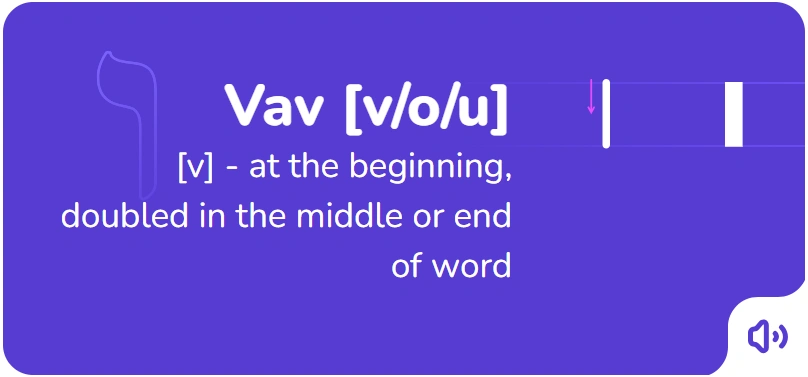
Capital letter Vav in Hebrew
It is written like an unfinished five. First, a small stroke downwards, then sideways and downwards with a curve. This forms a characteristic “nose”.
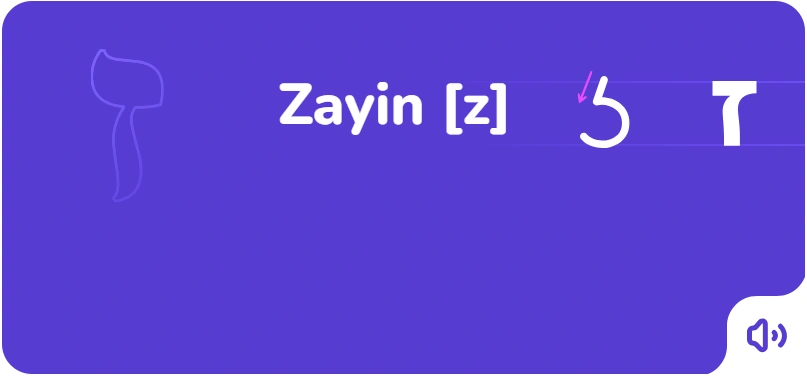
Capital letter Zayin in Hebrew
It is written in two steps: first, the right element is drawn — a smooth arc starting at the top and curving down to the left. After that, a short straight line is added on the left, drawn vertically from top to bottom.
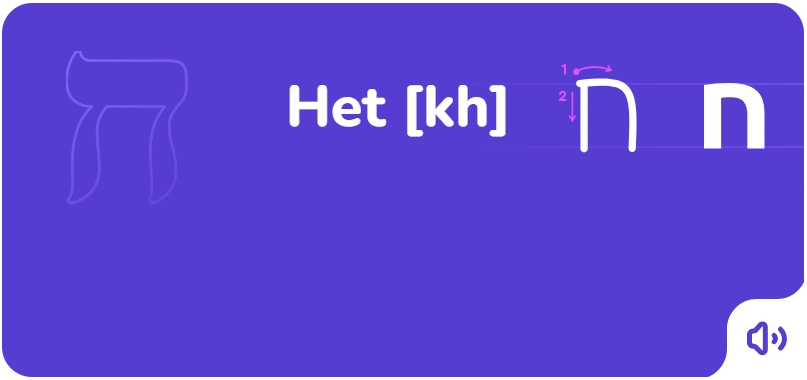
Capital letter Het in Hebrew
Start at the top, move to the left, then down, to the right and up — this creates an open loop. It is important to maintain the proportions and not to squeeze the shape.
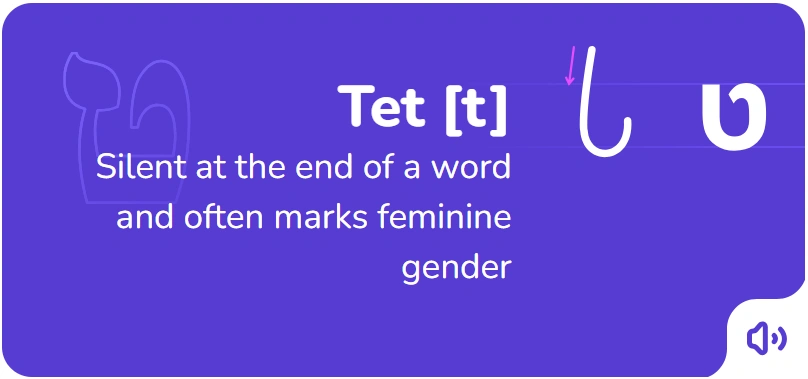
Capital letter Tet in Hebrew
A short stroke, slightly slanted to the left. It starts just above the line and descends to the middle of the line. It may have a slight hook at the end, but this is not essential.
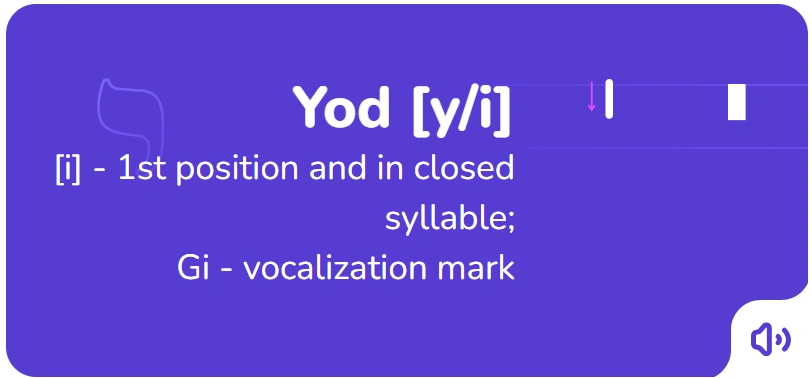
Capital letter Yod in Hebrew
It is written in one smooth line. It starts at the top, goes down, curves to the right and back up again. The result is an incomplete oval, open on the left, with a dot inside.
Capital letter Kaf in Hebrew
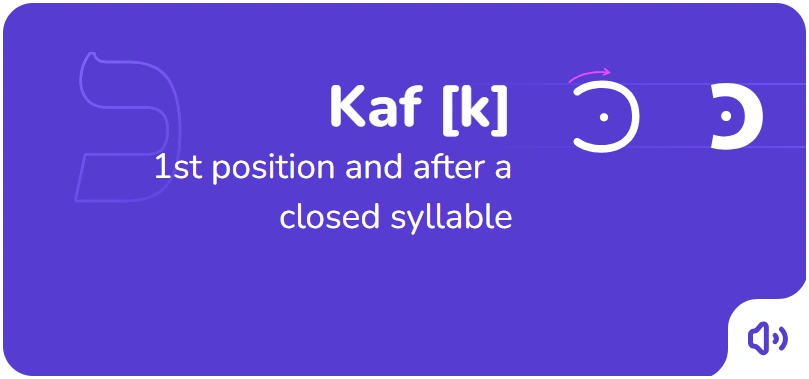
Start at the top point: draw a line downwards in an arc, then turn left and move upwards without closing the line completely — this will create a shape resembling an open bowl. The entire movement should be performed in one continuous stroke without lifting your hand.
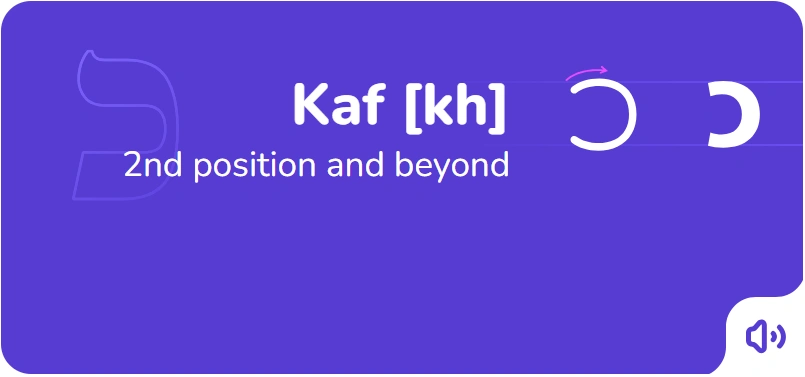
Capital letter Kaf in Hebrew
The final form (ך) is written in one continuous stroke: first, draw a line from left to right, forming a wide semicircular arc, then turn downwards and continue the vertical stroke below the bottom line.

Capital letter Kaf-sofit in Hebrew
It starts below the top line, makes a circle, then rises smoothly upwards and sharply curves to the right. The top is always higher than all other letters. It resembles the Russian capital letter “б”.
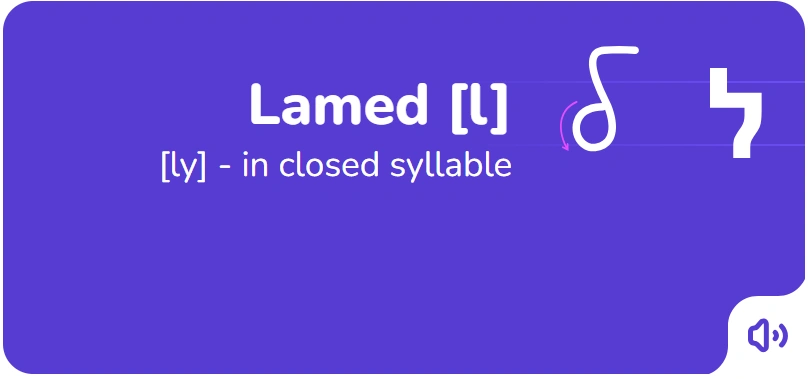
Capital letter Lamed in Hebrew
In handwriting, it resembles a mirror image of the Latin letter “N” with a slight tilt to the right. The right stroke often extends beyond the top line of the line.
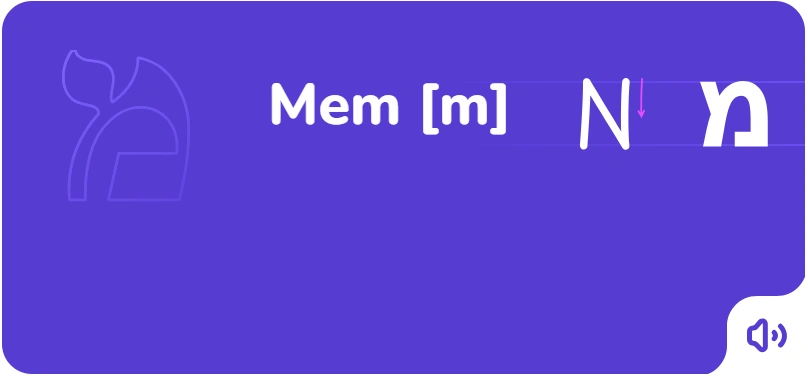
Capital letter Mem in Hebrew
Final form (ם) — consists of a closed oval and a short stroke adjacent to its left side. The lower edge of the stroke may slightly extend beyond the line.
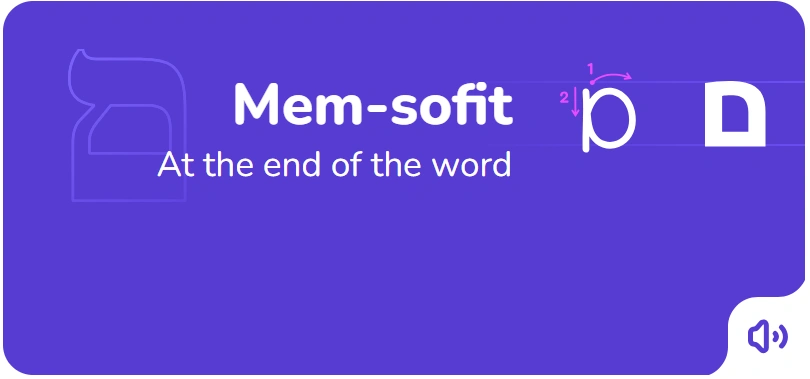
Capital letter Mem-sofit in Hebrew
First, a short arc-shaped slant to the left (entering stroke), then a bend to the left at the bottom. The tail of the letter curves to the left in an arc.
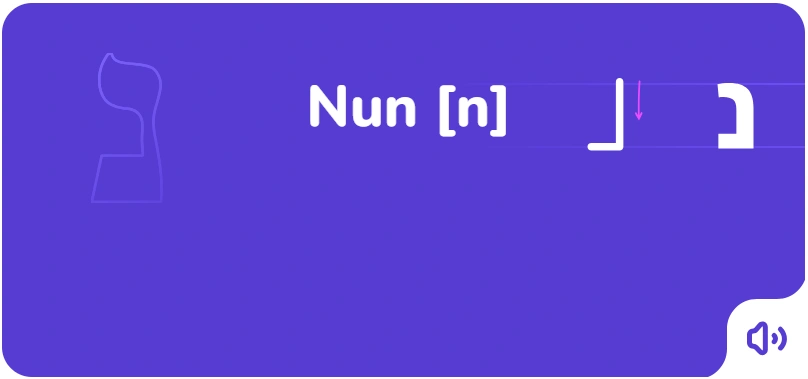
Capital letter Nun in Hebrew
Final form (ן) — written with a single straight stroke from top to bottom with a slight tilt to the left, without curves or additional elements.
It is drawn as a complete oval, almost a circle. It starts at the top and goes clockwise.
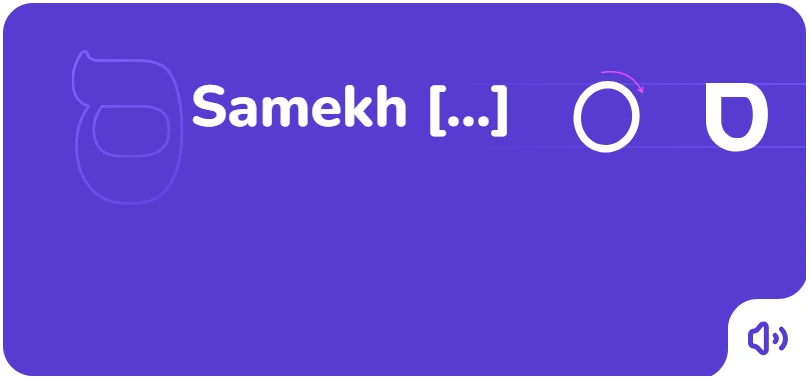
Capital letter Samekh in Hebrew
It begins with a vertical stroke from right to left, followed by a slanted arc line upwards and to the left. The result is an open shape with a rounded base. The letter is smooth, without sharp angles.
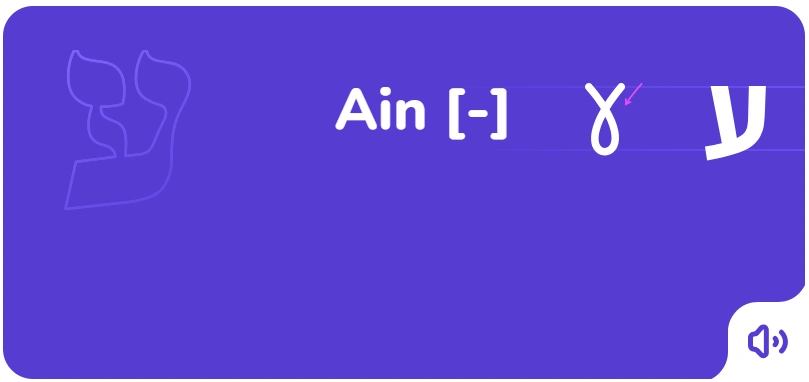
Capital letter Ain in Hebrew
First, draw a loop: up, right, down, left, up — an almost closed shape, open on the left. Often, a small inward curve is added at the top, hinting at an internal element, or simply a dot is placed inside.
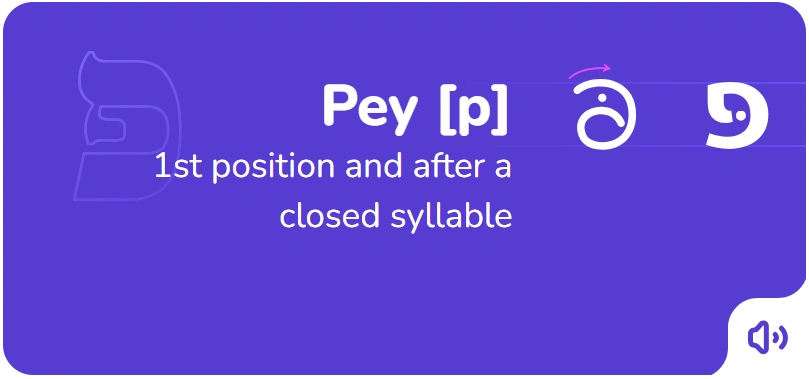
Capital letter Pey in Hebrew
It is identical to the letter pey, but without the dot inside.
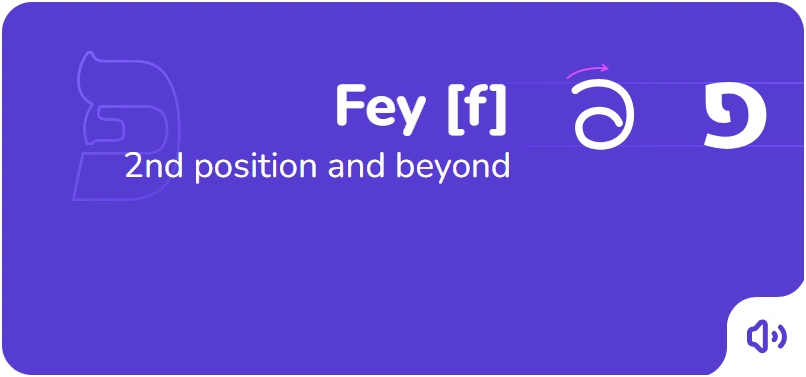
Capital letter Fey in Hebrew
Final form (ף) — begins with a wide loop at the top, which curves to the left and transitions into a long slanted stroke downwards. At the bottom, the line makes a smooth turn inwards, forming a characteristic “hook” at the base.
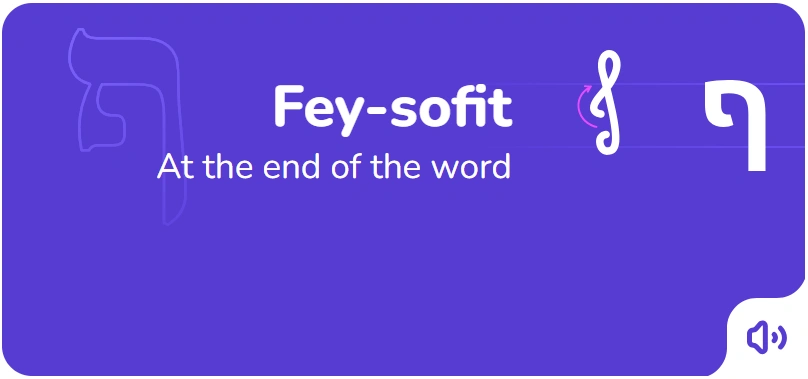
Capital letter Fey-sofit in Hebrew
It resembles the number “3” in shape, but with a distinctive curve. The upper part of the letter extends beyond the line, creating a noticeable protrusion.

Capital letter Tzadi in Hebrew
Final form (ץ) — begins in the same way as the fey-sofit — with a lower loop that transitions into a long upward stroke. Unlike the fey, the tail does not curl inward, but goes upward and slightly to the left.
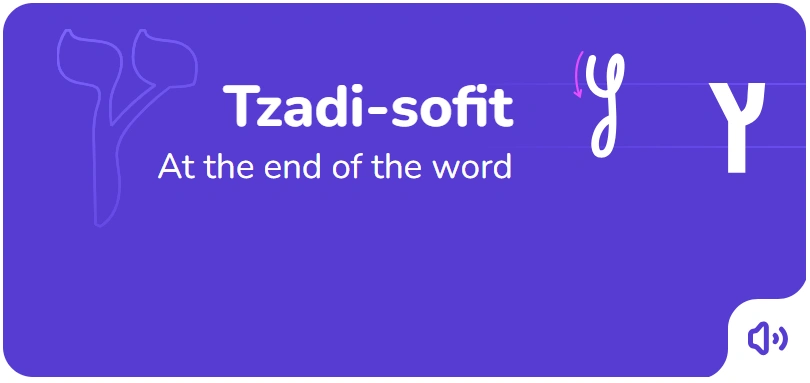
Capital letter Tzadi-sofit in Hebrew
First, draw a semicircle from left to right and down, then a short vertical stroke from left to right. The left part extends below the line. The shape is not continuous; it is written in two parts with gaps between them.
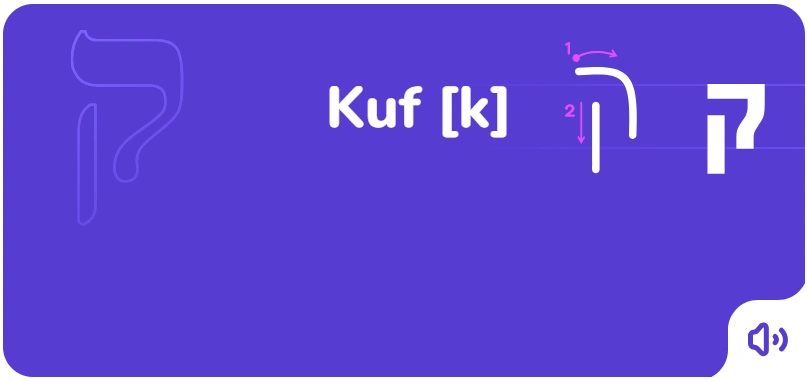
Capital letter Kuf in Hebrew
A short stroke from top to bottom with a gentle turn to the left. Similar to a comma, without sharp corners. The line is smooth, like a drop of water.
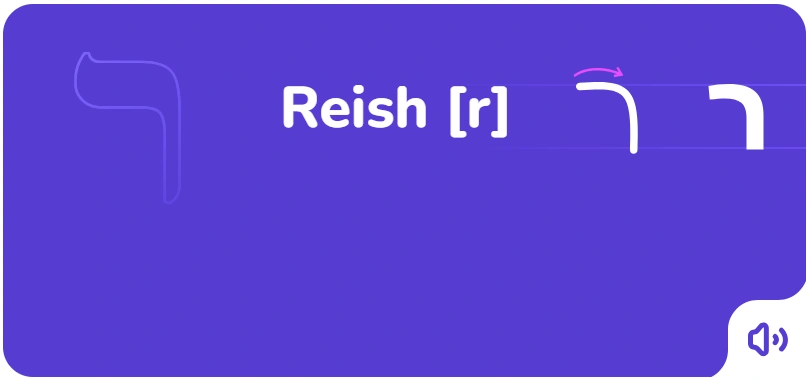
Capital letter Reish in Hebrew
It is written in one continuous movement in the opposite direction, resembling the Russian capital letter “е”, but written from right to left. It ends with an arc at the bottom, sloping to the left.
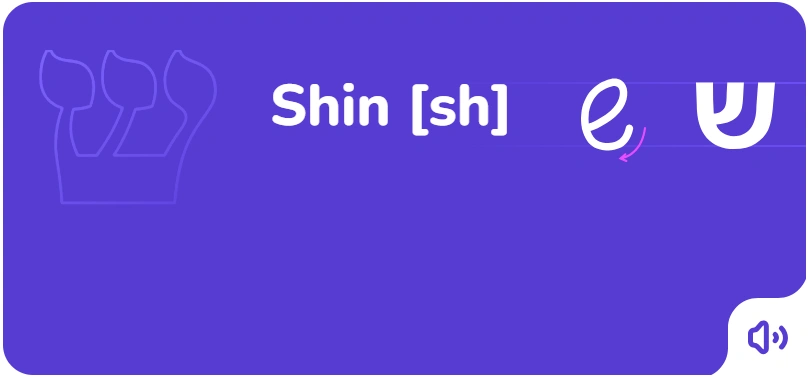
Capital letter Shin in Hebrew
In the handwritten version, syn is written in the same way as shin — with a movement resembling a mirror image of the capital letter “e”, only in the opposite direction — but the dot is placed above the left part of the letter, not above the right.
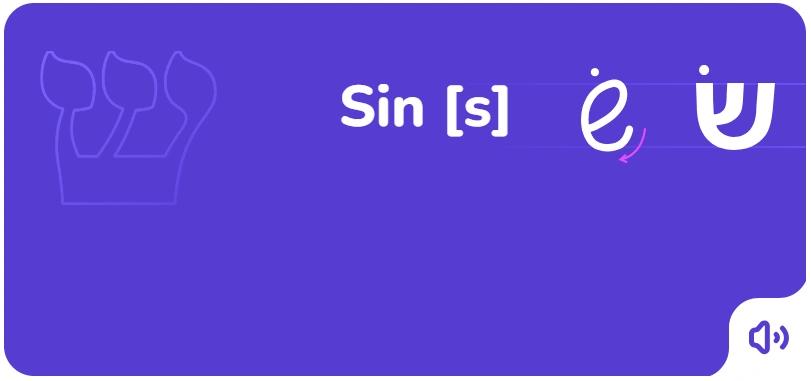
Capital letter Sin in Hebrew
Tav consists of two elements: first, a right stroke similar to “reish” is written, then a second stroke is added to the left, which may slightly extend beyond the bottom line of the row.
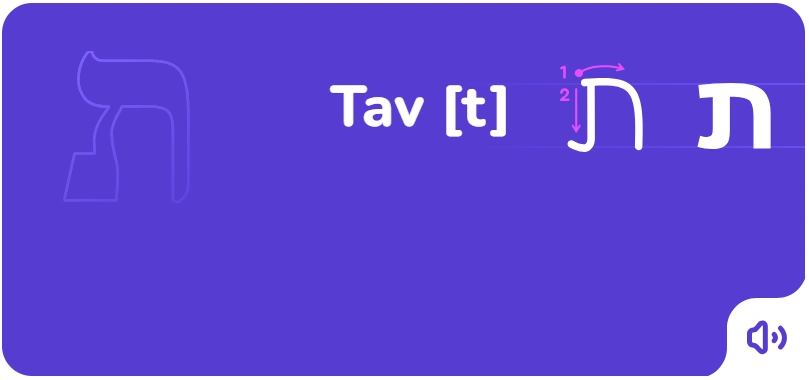
Capital letter Tav in Hebrew
As you can see, writing Hebrew letters is quite a feasible task if you understand their structure and follow the correct sequence of movements. Over time, your hand will memorise all these elements, and you will begin to write letters automatically. After such practice, you will be able to easily write a word in Hebrew or even a whole sentence without any prompts. Jewish writing will no longer seem like a mystery, but will become a convenient tool for expressing your thoughts. Enjoy writing in Hebrew and discover new facets of the language every day!


